At the time this photoshop tutorial I will discuss about how to create a text effect similar to any posts in the film Godzilla. This background has a sulfur-colored lights. This effect is my first time trying to get ngutak especial Action on photoshop. This effect is also never write in English on the site photoshop tutorial punyaku
At the time this photoshop tutorial I will discuss about how to create a text effect similar to any posts in the film Godzilla. This background has a sulfur-colored lights. This effect is my first time trying to get ngutak especial Action on photoshop. This effect is also never write in English on the site punyaku first photoshop tutorial that is no longer active because I do not extend the time domain.
Here is how the effect of making it.
Step Making Hot Godzilla Effect
Step 1
Create a new file with Photoshop. Adjusted to the size of the file to your needs. In the example this tutorial, kugunakan a file size of 450 x 300 pixels, 72 dpi.
Step 2
Create a new file that is black. How pressing the letter D on your keyboard, then press Alt + Backspace. Or by selecting the menu Edit> Fill, select the Black color to apply.
Step 3
Select the Type tool in the Photoshop toolbox, and then typing the text will be given effect in a file that black line. Example tutorial on the image below, the type of kubuat Arial Black letters with white.
Step 4
Make sure that any posts in a layer active, give effect Emboss on this paper. how to select the menu Filter> Stylize> Emboss. When a warning dialog box appears, click OK to confirm the command rasterize. Set the value of the settings like picture below (not the absolute value, you can change according to your own taste).
Step 5
Choose the menu Image> adjustment> Color Balance. Make that any posts to be quite greenness.
Step 6
Munculkan selection on the layer writing. The easiest way to display the selection is to do Ctrl + click on the tumbnail layernya.
Step 7
wide area selection. Do this by choosing the menu Select> Modify> Expand. Fill secukupnya value. Illustrated tutorial on the image below kuberi number 10.
Selection results will be similar to this.
Step 8
Fill in the white background layer in the area which is in the selection process. Ensure the background layer active in the first condition.
Then press D on your keyboard, then press Ctrl + Backspace.
After appearing on the white area of selection, the selection removed. How to select the menu Select> Deselect. The result is like the picture below.
Step 9
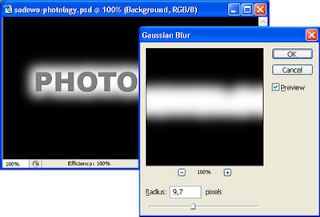
Give a blurred effect on the background layer. How to effect this is to select the menu Filter> blur> Gaussian blur. Arrange radiusnya value to be obtained under the image like this (can change according to the size of any posts you).
Step 10
Now in order to make the background color of its earlier self sulfur. How to select the menu Image> adjustment> Color Balance. Slide the slider settings towards Green and Yellow. Do this on each color range Shadow, Midtone, and Highlight. Value your settings as you desire.
Step 11
Make a background that becomes quite berlekuk. How to select the Filter> Distort> Wave. Make settings such as picture below. To explore at random the other forms of distortion, Click Randomize button.
Here is a picture photoshop tutorial on creating Godzilla effect any posts that have been so.
Congratulations to learn and create with Photoshop.
Effeck any posts Godzilla
Labels: Tutorial Photoshop 2


 Previous Tips N Trick

0 comments:
Post a Comment