
Photoshop Tutorials For this I will try to make a photo to be beautiful and good in the view, after making the previous tutorial I want to make this a ... Beda with previous Tuturial this easier to do in the new beginner to learn Photoshop.
Step 1
You open the image in the edit
Step 2
Select the Selective Color.
Being Green and Change.
Then you set,
Step 3
Duplicat Layer, and a Change Blending Mode Color
Step 4
Repeat 2 but Langh to Change the color yellow, and set:
Change the Blending Mode and become a Color
and you can see the results

Grass Effect Photo
Posted by
Design community
3
comments
![]()
Labels: Photo Effect
Make a Tattoo in Your Self

For this Photoshop tutorial I will create your own tattoo, rather than us going to the tattoo craftsman we can make our Photos with more cool tattoo without having to go to the tattoo carpenters, we can only use Photoshop to make Photo of our more fun. Tutorial to continue reading this we:
This tutorial is easier than the previous tutorials, for beginners and can certainly make ...(^_^)let us follow the This Photoshop tutorial:
Step 1
We will prepare a Tattoo in pairs in the area of our bodies, I use artists that are not clear .... hehehehehe (^_^)
Step 2
Drag Tatto that we have to prepare on our Photos, and then we set the place by pressing the CTRL + T to our Tattoo angle 40 degrees.
Step 3
Remove the part we do not need to use the Eraser Tool,
You can see the results
GOoD LucK...!!
Posted by
Design community
4
comments
![]()
Labels: Photo Effect
Photo HandPhone Refine The Low Resolution

Photoshop Tutorials This One To learn the new Photoshop.
Wrong time-wrong file in the computer, I found a photo of my friend who tow in the heap-stack file .. but the photos have spots taken as a mobile phone with low resolution. This fact can be set so that the better .. but it is full ... because it can not .. hehehe ... but with a few photos of the business in its minimal noise ...
More to follow Clearly Next Step ..:
Step 1
Open the file in a photo edit.
Step 2
Press CTRL + J to duplicate .. I like to make it duplicates the original file first .. because its results for comparison .. layer results in duplicate Click Filter> Noise> Reduce Noise (this command may only have in Photoshop CS2 and over .. I may own a Photoshop CS2.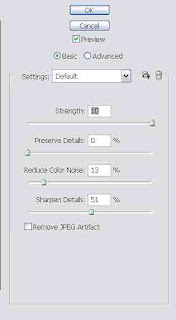
Now again duplicate the layer 1 (layer in which Searched edit)
Step 3
Click Filter> blur> gaussian blur
Setting the radius 3,
Then Change the layer effect to be SOFT LIGHT

COMPARISON
Good Luck
Posted by
Design community
1 comments
![]()
Labels: Photo Effect
Make a Lens Eye Using Photoshop

For those of you who want to appear more beautiful and Handsome you can use a sharp lens, but the lens is very expensive now, then it is in this Tutorial Photoshop I will make eye lens Using Photoshop.so we need not be difficult to buy the lens enough we use photoshop photo become more expresiv.
Step 1
Like the previous tutorials you select the photo you want to edit.
Step 2
The selection of the ball using MarQuee Tool, look like the picture below.
Step 3
Still in the position of your selection and press Ctrl + j to duplicat area selection.
Step 4
Seleck Image > Adjusment > Level , and Set :
Result
Step 5
Seleck Image > Adjusment > Heu/Saturations ( Ctrl++U ), and set :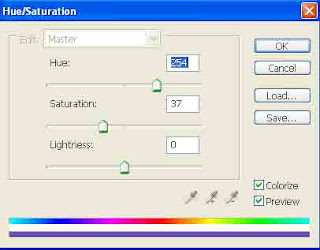
Step 6
Seleck Image > Adjusment > Color Balance , and set :
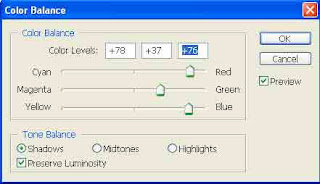
Change Blending Mode to become Color.
And you can see the results.

Good Luck
Posted by
Design community
2
comments
![]()
Labels: Photo Effect
Effect Red Glass Photo

To this tutorial photoshop I will create Effect Red Glass Photo to friends can also download the PSD file from this tutorial. for beginners can follow the steps here because Tutorial Photoshop is very easy and the results satisfactory .... hehehehe ... 3x
Step 1
You open the file in Photo Editing, Photo Here I use a china artist beautiful and sweet ... hehehehe ... 2x
Step 2
You Duplicat photo, press the Ctrl + j.
Step 3
Select Filter> texture> Staned Glass. Set then you like this: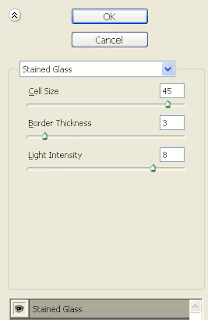
change the Blending Mode to become Exclussion.
Step 4
Back to Baground and then copy the layer, and set its position.
Step 5
Ctrl + U ,Remember we are still in the active layer Baground Copy,and set:
Step 6
Duplicat baground (Ctrl J), select Filter> Distort > Shear, and set: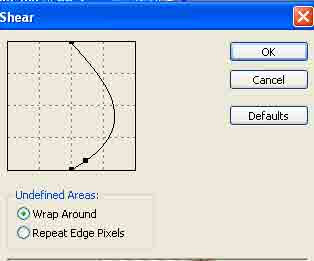
Hide all layers except layer baground 2.
and delete the part that is not important as the picture below.
and change the Blending mode to become Luminosity.
open all layers of the hide and you can see the results.
Hopefully Success
Download PSD
for Tutorial Photoshop below the files you can download the PSD here.
Posted by
Design community
0
comments
![]()
Labels: Photo Effect
Text Effect Photos
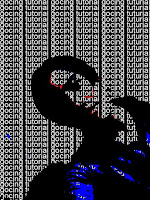
For this tutorial I try to make a Text Effect Photos, For more details you follow the tutorial below so that it does not do this and try to be ... hehehe ...
Step 1
you create a new layer 480x640 with black baground, then write your text as you wish, here I use Tutorial gocing.
> swap
Step 2
Now open the photo file you want to edit, here I use my own photo,
Step 3
Click Layer> New adjustment Layer> posterize, 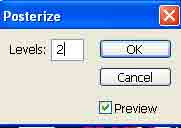
Step 4
and press CTRL + SHIFT + U or CLICK image> adjustment> desaturate to make the image so black and white .. (Do not forget to layer still in the background.)
and this is the positions layer.
Step 5
Drag the layer baground earlier writings on the photo to edit, and position as the layer below,
Step 6
Hide the text layer it .. and click on the background layer. Click Select> Color Range. Setting as below:
Step 7
Turn on more layer to its text and press DELETE button.

Once finished you can see the results of my prayers ... good luck.
Posted by
Design community
0
comments
![]()
Labels: Photo Effect

 Previous Tips N Trick
